-
Making it easy to set up your home WiFi network
We are thrilled that PC Magazine recently ran a review of our router product. In summary this is what they said:
The Peace Wireless Router applies content filtering and Internet time scheduling to every device on your home network, but getting it configured requires some serious tech expertise.
While we are happy about the first part of the summary, the second part might be a little scary to people who don’t consider themselves tech experts.
If you are not a tech expert, don’t run away just yet, because it is you that we are trying to help with pcWRT – the peace wireless router. First let me explain what we did to help make your life a little easier. Then perhaps you can let us know what we are missing, so that we can continue to improve to make the product work for you.
1. Connecting the router
We know some parents dread the idea of having to hook up a router. It seems daunting, or other people make them believe so. But in fact there are only two wires to connect: the power cable and the Ethernet cable. Connect the power cable to the power plug, and then connect an Ethernet cable from the router WAN port (marked on the router case) to your Cable or DSL modem, and you’re done. It’s that simple. There’s one variation: if your ISP provided you a modem/router combo (such as AT&T 2Wire or Verizon FiOS), connect the Ethernet cable from the router WAN port to one of the LAN ports (usually there are four) on the AT&T or Verizon router.
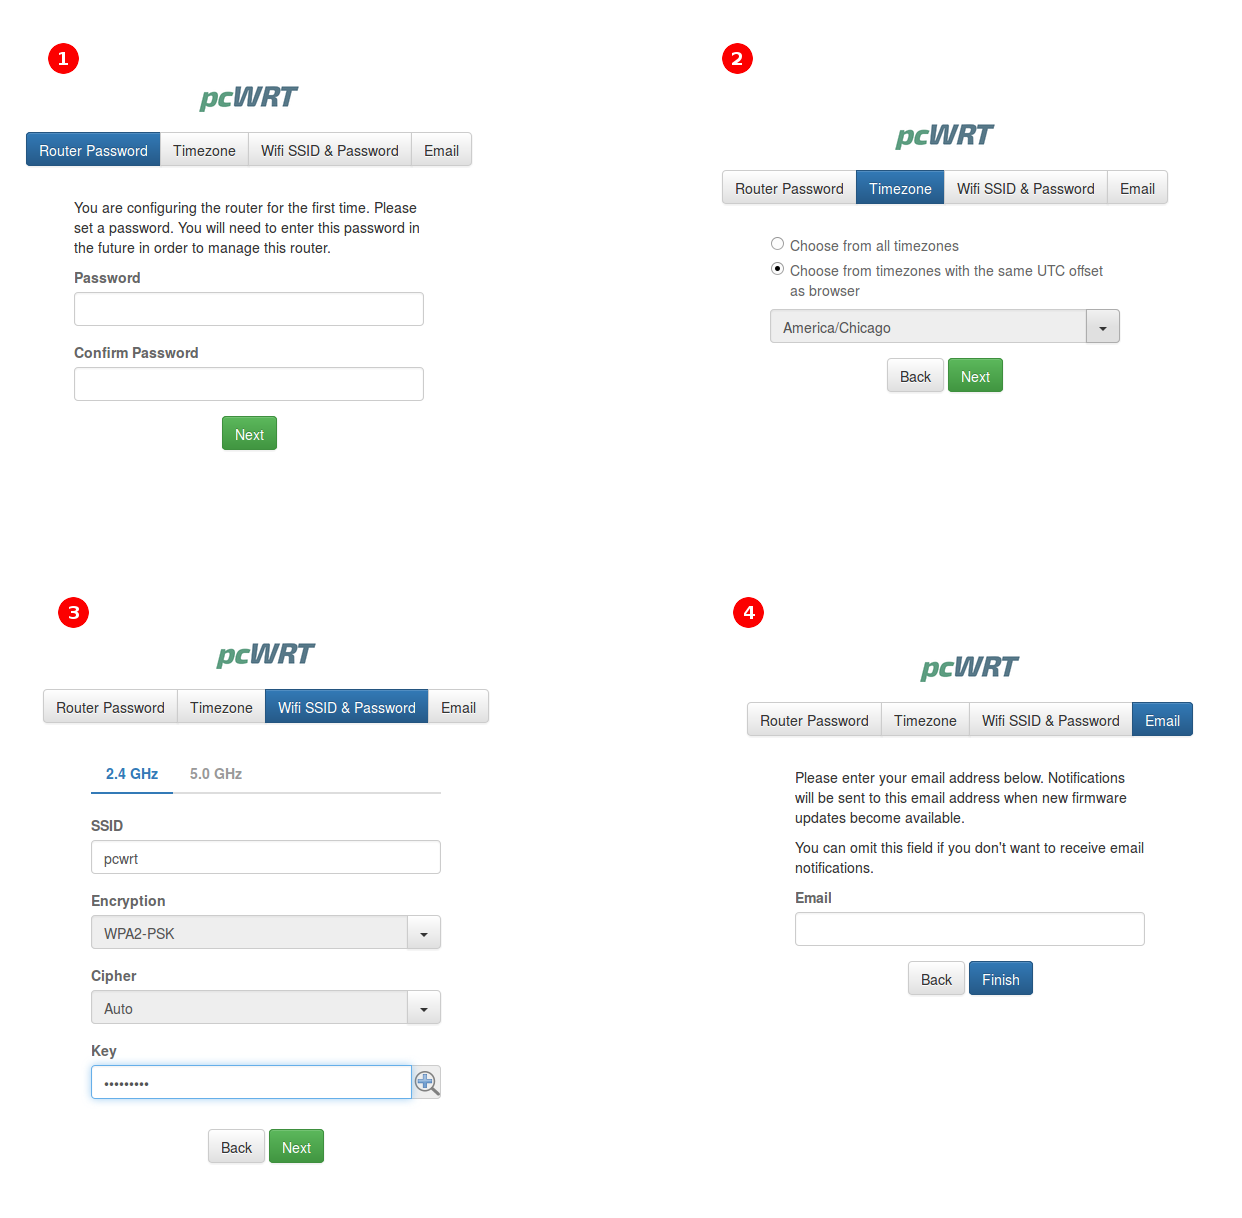
2. Initial Setup
After the router is powered on, there should be an open WiFi signal named ‘pcwrt’. Connect to the WiFi then enter http://192.168.10.1 into your browser. You’ll be guided to do the initial setup in four easy steps:
- Set a password for the router
- Set your timezone
- Set WiFi SSID, encryption and password
- Optionally, enter your email address
When you finish, you’ll have WiFi and Internet access. Easy, right?
3. Parental Control
After you finish the initial setup, your router is functioning like any other WiFi router – without parental control. To turn on parental control, enter http://192.168.10.1 into your browser. Alternatively, you can use http://pcwrt/ if you like symbolic names. But don’t confuse http://pcwrt/ with http://www.pcwrt.com, the former is the address for your router (invisible from the Internet), the latter is our web site on the Internet.
Enter the router password you chose during initial setup, and then:
- Click on the Parental Control icon
- Click the Enable button
- Click Save at the bottom of the screen
Now you have parental control for your home network, with these functions:
- Content filtering by OpenDNS Family Shield, which blocks pornographic content, proxies, and anonymizers.
- Google SafeSearch, which blocks inappropriate images and videos in search results.
And the content filtering cannot be bypassed with techniques such as DNS overriding, hosts files, or proxies and VPNs. Don’t worry if these words don’t ring a bell. You don’t have to know how these things work. However, we want you to know that if your parental control solution does not block these techniques, you are having a false sense of security.
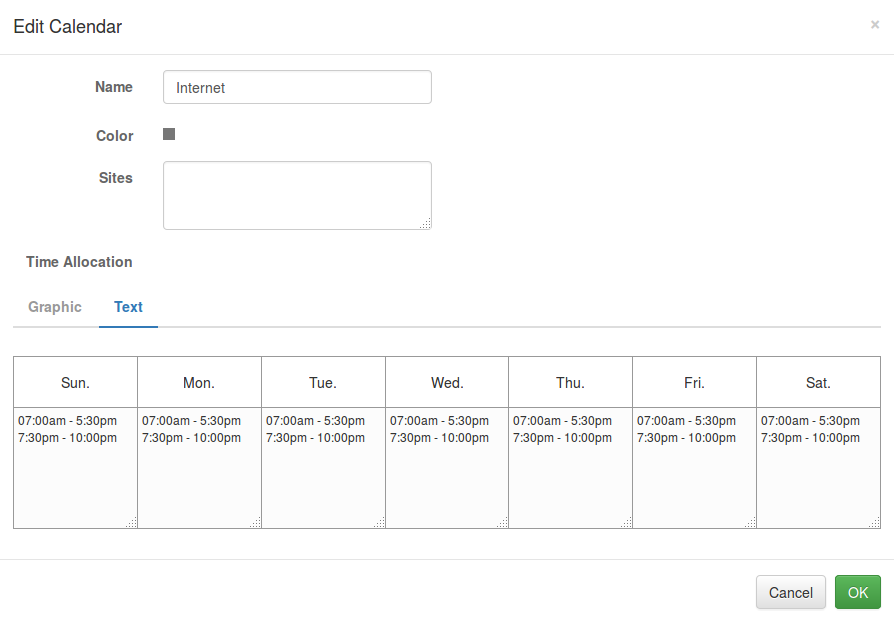
4. Set an Internet Schedule
Follow these steps to create a schedule for Internet connectivity for your home network:
- In the Default profile, click the View/Edit Calendars button.
- Enter a name for the calendar, for example, “Internet”.
- Leave the Sites box empty.
- Under the Graphic tab, click on a day, drag the arrows to create a date range.
- Switch to Text tab, change the time range as you wish.
- Click OK, and OK again to dismiss the Calendar dialog.
- Click Save at the bottom of the screen to save your changes.

What if you want to pause the Internet during dinner time? You can enter a calendar like this:
5. Different Policies for Parents
If you want a different set of policies for parents, you need to create another profile and add parents’ devices to it:
- Create a new profile, name it “Parents”, for example.
- Set up content filtering options and calendars for the new profile. For example, you can choose Google Public DNS if you don’t want content filtering, uncheck Safe search if you don’t want to filter search results, or completely turn off parental control for this profile by unchecking Enable Parental Control.
- Add parent’s devices to the new profile by clicking the Add button under the Devices section. But before you can add devices to this profile, you need to identify your devices (see the next section).
- Click Save at the bottom of the screen to save your changes.
6. Identify Your Devices
We recommend the following procedure to identify your devices.
- Connect each of your devices to the pcWRT router, either via WiFi or wire.
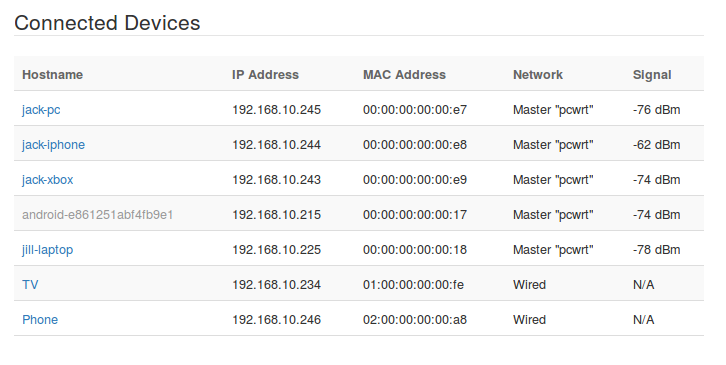
- Log on to http://192.168.10.1 (or http://pcwrt/). Click the Status button at the top right corner.
- In the Connected Devices section, the devices that the router know about will be displayed in blue, while devices that the router does not know about will be displayed in gray.
- Click on the Hostname to name or rename the device.
A lot of times it’s pretty easy to tell which device is which. For example, if you just connected a new Android device and you see “android-e861251abf4fb9e1” in gray in the Status page, that is the device you just connected.
What if you have multiple Android devices and you see multiple hostnames like “android-e861251abf4fb9e1” in gray? You can identify the device by its IP address: open a browser on the device and enter http://192.168.10.1/myip.html (or http://pcwrt/myip.html). Match the IP address displayed in the page with the IP addresses displayed in the Status page.
Conclusion
In the above I briefly described how you can set up the pcWRT router and the parental controls in some simple scenarios. There’s a lot more that the router can do. But as the scenarios become more complex, so are the steps involved in setting them up. Our goal is to keep simple things simple, while making complex things possible. If you have any questions or suggestions, please let us know. We are continuously working to make the product better!
Before I sign off, here are some links you might find interesting:
How to set Internet access time limits in pcWRT


Recent Posts
- How to reset the pcWRT router
- How to create your SSH key and use it on the router
- How to reset router password by email
- How to set up SurfShark WireGuard VPN on the pcWRT router
- How to set up Proton VPN WireGuard on the pcWRT router
Recent Comments
- on How to create your SSH key and use it on the router
- on How to create your SSH key and use it on the router
- on How to setup TunnelBear OpenVPN on the pcWRT router
- on How to setup TunnelBear OpenVPN on the pcWRT router
- on How to enable native dynamic DNS on the pcWRT router
Archives
- April 2024
- March 2024
- August 2023
- May 2023
- February 2023
- June 2022
- December 2021
- November 2021
- August 2021
- January 2021
- December 2020
- October 2020
- August 2020
- July 2020
- June 2020
- May 2020
- April 2020
- February 2020
- January 2020
- December 2019
- October 2019
- December 2018
- August 2018
- July 2018
- June 2018
- January 2018
- November 2017
- October 2017
- September 2017
- August 2017
- July 2017
- June 2017
- January 2017
- August 2016
- May 2016
- December 2015
- August 2015
- July 2015
- May 2015
- April 2015
- March 2015
Categories


