Assuming that you’ve already set up the pcWRT router, and you want to extend the WiFi range with a TP-Link router. This part assumes that you use an Ethernet wire to connect the TP-Link router to the pcWRT router. If you are bridging the TP-Link router with the pcWRT router via WiFi, check out part 1.
These are the steps (you’ll need a laptop and an Ethernet cable):
- Set IP address for the extender router (TP-Link).
- Perform this step before you connect the two routers.
- Power on the extender router and connect the Ethernet cable from the laptop to a LAN port (you may want to disable WiFi on the laptop so that you know for certain that the laptop is connected to the extender router).
- Open a browser and log on to the extender router management console (should be http://192.168.0.1 or http://192.168.1.1).
- Choose menu Network -> LAN. Change the IP Address to one in the pcWRT LAN subnet. For example, if your pcWRT IP address is 192.168.10.1 (the default), enter 192.168.10.2.
- Save and reboot the router.

- Connect the two routers
- Connect an Ethernet wire between a LAN port on the TP-Link and a LAN port on the pcWRT.
- Set TP-Link WiFi properties
- After the router reboot, it’ll have a new IP address. Use http://192.168.10.2 (i.e., the address you entered in step 1) to get back to the router console.
- Choose menu Wireless -> Wireless Setting. You may pick an SSID that is different from the pcWRT SSID, or the same. It is advised that you pick a different name first. After everything tests out OK, then change the SSID to be the same.
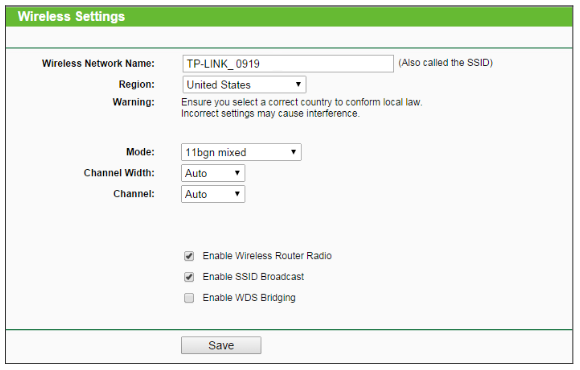
- Save and reboot the router.
- Set extender WiFi security.
- After reboot, log in to the extender router console.
- Choose menu Wireless -> Wireless Security.
- Select WPA/WPA2 – Personal, and WPA2-PSK. You can pick any Wireless Password you want, but it is advised that you use the same password as the pcWRT WiFi so that you can achieve seamless transition between the WiFi signals when you later set the SSIDs the same.
- Save and reboot the router.

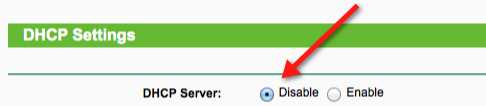
- Disable DHCP for the extender router.
- After reboot, log in to the extender router console.
- Choose menu DHCP -> DHCP Settings. Click Disable to disable DHCP.
- Save and reboot the router.
To test out the setup, connect a device to the TP-Link WiFi. Login the pcWRT management console and check the Status page. You should see the device in the Connected Devices section. If not there, click the refresh icon to the right of the Connected Devices label.
If everything tests out fine, repeat step 3 to set the SSID for the TP-Link router the same as the pcWRT router.
.