-
How to setup NordVPN IKEv2 on the pcWRT router
Download root CA certificate for NordVPN IKEv2 connections
Update 12/07/2021: It is no longer necessary to download the NordVPN IKEv2 certificate (skip to the next section).
Download the NordVPN IKEv2 Certificate from here: https://downloads.nordcdn.com/certificates/root.der
Add a NordVPN IKEv2 connection
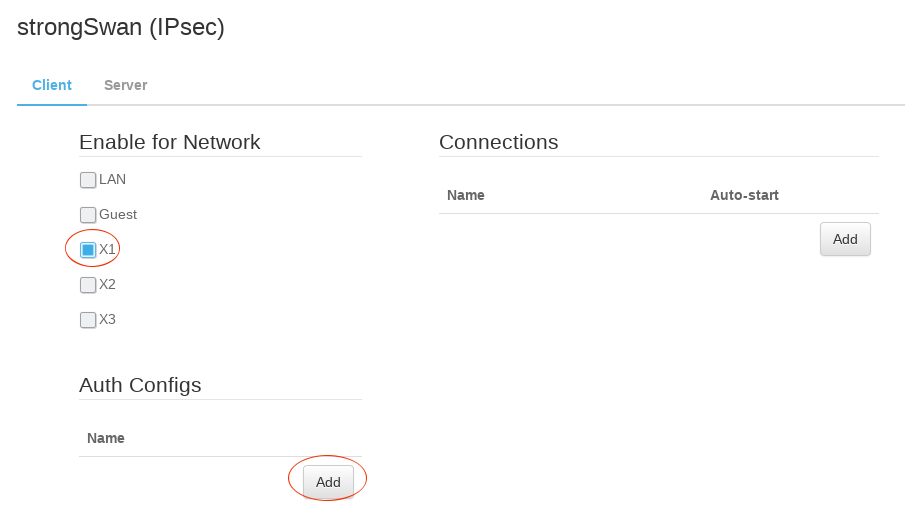
- Log on the pcWRT console, open the “strongSwan (IPsec)” page under Apps.
- Under the Client tab, check the network you want to enable NordVPN for, then click the Add button under “Auth Configs” to add a new authentication configuration for NordVPN.
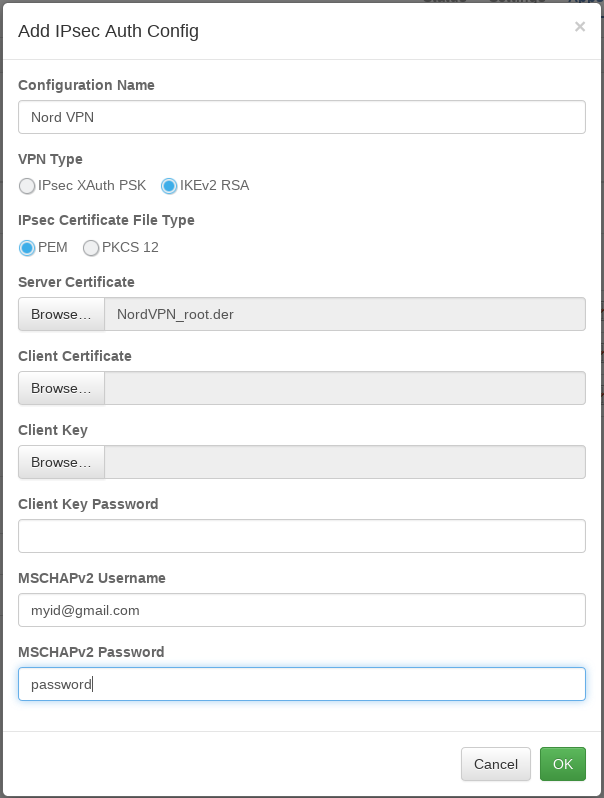
- In the “Add IPsec Auth Config” dialog:
- Enter a name for the Auth Config
- In the Server Certificate field, select the NordVPN IKEv2 certificate file downloaded above. Update 12/07/2021: it is no longer necessary to upload the IKEv2 certificate. You can leave this field empty.
- Enter your NordVPN username and password in the MSCHAPv2 username & password fields.
Click OK to dismiss the dialog.
- Click the Add button under Connections. Then, enter a name for the IKEv2 connection, enter the server host name to connect to, select the Auth Config created in the previous step. Click OK.

- Click the Save button to save changes.
Start a NordVPN IKEv2 connection
- Click on the blue “Play” button to start the NordVPN IKEv2 connection.
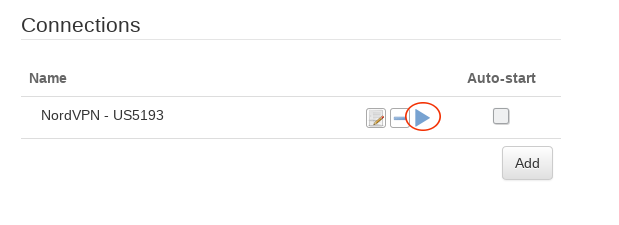
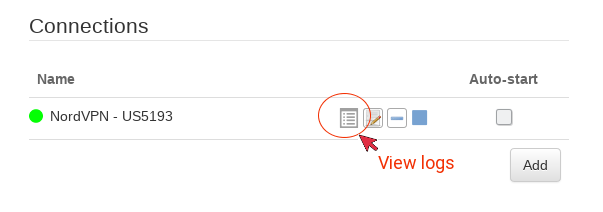
- If connection is successful, a green dot will appear on the left of the connection configuration line. In case of connection failure, click on the “log” icon to view IKEv2 logs.


Recent Posts
- Observing Android VPN Leaks with the pcWRT Router
- How to set up a second pcWRT router as an Access Point with VLAN support
- Is the MELLO charger a scam (Kickstarter)?
- How to reset the pcWRT router
- How to create your SSH key and use it on the router
Recent Comments
- on How to reset router password by email
- on How to reset router password by email
- on Does your parental control pass the DOH test?
- on How to create your SSH key and use it on the router
- on How to create your SSH key and use it on the router
Archives
- January 2025
- December 2024
- June 2024
- April 2024
- March 2024
- August 2023
- May 2023
- February 2023
- June 2022
- December 2021
- November 2021
- August 2021
- January 2021
- December 2020
- October 2020
- August 2020
- July 2020
- June 2020
- May 2020
- April 2020
- February 2020
- January 2020
- December 2019
- October 2019
- December 2018
- August 2018
- July 2018
- June 2018
- January 2018
- November 2017
- October 2017
- September 2017
- August 2017
- July 2017
- June 2017
- January 2017
- August 2016
- May 2016
- December 2015
- August 2015
- July 2015
- May 2015
- April 2015
- March 2015
Categories


