-
How to set up a VPN server at home (on the router)
If you did some search on this topic, you are probably confused. Most articles on this topic confuse readers rather than helping them.
Why you need a VPN server at home
First of all, let’s make it clear that there’s only one reason to set up a VPN server at home: you want to access your home network from outside.
If you are trying to hide your IP address, hide your Internet traffic from the ISP, access contents not available in your geographical area, you need a VPN client and a VPN service subscription, not a VPN server at home.
There are many reasons that you may want to access your home network remotely. These may include:
- Access to files stored on your home network
- Remote desktop to a machine on your home network
- Encrypt your traffic for better security when you are connected to a public WiFi network
- Utilize a network wide ad blocker (e.g., the ad blocker on the pcWRT router or a pi-hole) that you set up at home
- Access to streaming services at home when you’re traveling
- Share streaming service or media from one house to another
- Pretend that you’re home while traveling
What you need
There’s more than one way to set up a VPN server at home. But it’s easiest to set it up on the router.
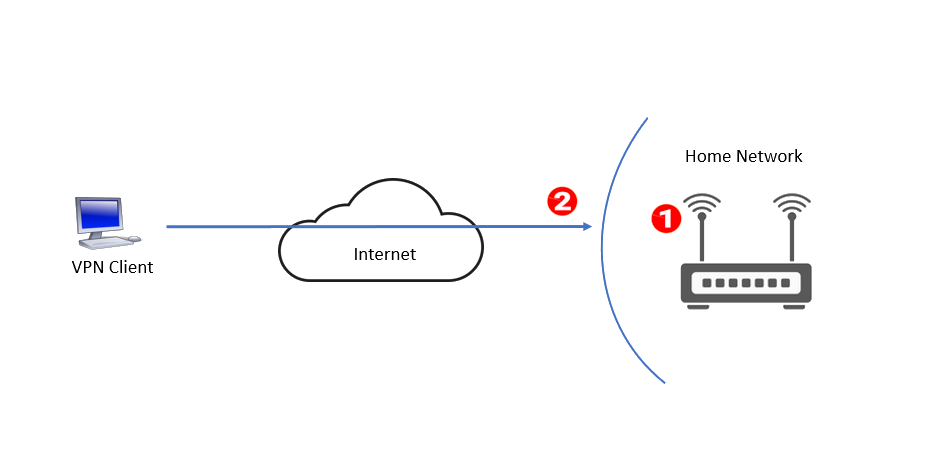
As shown in the diagram below, there are basically two requirements:
- A router that supports VPN server
- A public IP address assigned by your Internet Service Provider (ISP)
Many routers support VPN server. Check your router’s manual to find out whether it’s supported, and how to configure and start it up.
The public IP address is needed so that your VPN client devices can connect back home from outside. It is usually displayed on the router’s Internet or Broadband page.
In the US, most users get a public IP address at home from their ISPs. But there are more and more ISPs that put their subscribers behind Carrier Grade NAT (CGNAT), due to the increased scarcity of IPv4 addresses. Before trying to set up the VPN server on the router, check that you have a public IP address from your ISP.
Without a public IP address, your remote device running the VPN client has no way to contact your VPN server. For this post, I assume that you do have a public IP address from your ISP. I’ll address the case where you don’t have a public IP address (i.e., behind CGNAT) in another post.
What are the steps?
If you have a dynamic IP address from your ISP, set up Dynamic DNS (DDNS) on the router. DDNS maps a domain name to your home IP address, and you can use that domain name to connect to your VPN server at home. Most routers support DDNS.
If you have a static IP address from your ISP (which is rare), you can omit this step. But you may still choose to do it if you want to access the VPN server by domain name instead of by IP address.- Set up and start the VPN server on your router by following the instructions in the user manual. Set the VPN server to auto-start if there’s an option.
- Install VPN client software (if needed) on the remote device(s). Set up the VPN configuration to connect to the VPN server (again, check the router manual).
Here’s a guide of how to set up a VPN server on the pcWRT router: The Complete Guide to Setting up a WireGuard® VPN Server at Home with pcWRT
Security considerations
- Use non-standard ports if possible. E.g., for OpenVPN, use a port other than 1194; for WireGuard choose a port other than 51820, etc.
- Choose UDP over TCP. Hackers have a harder time probing UDP ports than TCP ports.
- Choose a secure VPN protocol. OpenVPN, IKEv2 and WireGuard are good choices. Avoid PPTP.
* WireGuard® is a registered trademark of Jason A. Donenfeld.


Recent Posts
- Observing Android VPN Leaks with the pcWRT Router
- How to set up a second pcWRT router as an Access Point with VLAN support
- Is the MELLO charger a scam (Kickstarter)?
- How to reset the pcWRT router
- How to create your SSH key and use it on the router
Recent Comments
- on How to reset router password by email
- on How to reset router password by email
- on Does your parental control pass the DOH test?
- on How to create your SSH key and use it on the router
- on How to create your SSH key and use it on the router
Archives
- January 2025
- December 2024
- June 2024
- April 2024
- March 2024
- August 2023
- May 2023
- February 2023
- June 2022
- December 2021
- November 2021
- August 2021
- January 2021
- December 2020
- October 2020
- August 2020
- July 2020
- June 2020
- May 2020
- April 2020
- February 2020
- January 2020
- December 2019
- October 2019
- December 2018
- August 2018
- July 2018
- June 2018
- January 2018
- November 2017
- October 2017
- September 2017
- August 2017
- July 2017
- June 2017
- January 2017
- August 2016
- May 2016
- December 2015
- August 2015
- July 2015
- May 2015
- April 2015
- March 2015
Categories


