-
Dynamic DNS Explained
What is Dynamic DNS?
In short, Dynamic DNS (DDNS) is a DNS service for hosts without static IP addresses.
There are two sides to your home network, the internal network (aka LAN) and the external network (aka WAN). The internal IP addresses are assigned by the router (and can be changed by the user), while the external IP address (usually, only one) is assigned by your ISP (Internet Service Provider).
When you are away from home and want to connect back to your home network, you need to know the external IP address. Such is the case when you are sitting at a coffee shop and want to VPN back to your home router for better security.
But there is a potential problem. In most cases, the external IP address assigned by your ISP is dynamic, i.e., it may change over time. Maybe not so frequently, but it could change. When that happens, your VPN client (connecting to your router’s external IP address) can no longer connect.
And that’s where Dynamic DNS (DDNS) comes in – it allows you to use a fixed domain name to access your home network from the outside. You can use the same domain name even when the IP address changes.
How does DDNS work?
You need a Dynamic DNS (DDNS) service provider to set up Dynamic DNS. And there are many free ones available. For example, Duck DNS, Dynu, No-IP, ClouDNS, but there are many more.
There are two parts to any Dynamic DNS service:
- A domain name that maps to your IP address: you’ll get a subdomain from the domain(s) managed by the Dynamic DNS service provider.
- A DNS updater running on your home network. The updater polls for your external IP address periodically and keeps the domain name current with your external IP address.
How to set up Dynamic DNS
Once you’ve decided which DDNS service you want to use, just sign up for an account and follow the instructions on the website. There may be minor variations among different DDNS service providers, but in essence setting up a DDNS service consists of three steps:
- Sign up for an account
- Choose a subdomain to use
- Download (or create) and install the DDNS updater
In our experience Duck DNS is the easiest to use. Even though it doesn’t provide a lot of instructions, the web interface is pretty simple and straightforward. You don’t need to create another login id, just use your Twitter, GitHub, reddit or Google account to login.
What to do on the pcWRT router
The pcWRT router provides a DDNS updater so you don’t need to install the updater from your DDNS provider’s website. But since the updater on the pcWRT router only supports DNS-O-Matic, you do need to sign up for an OpenDNS account and link your DDNS service with DNS-O-Matic. If you use OpenDNS Home, you’d already have an OpenDNS account.
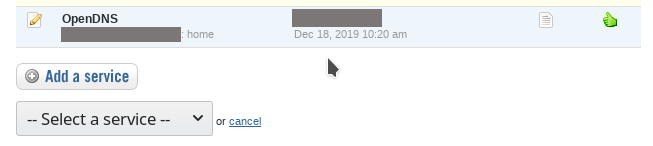
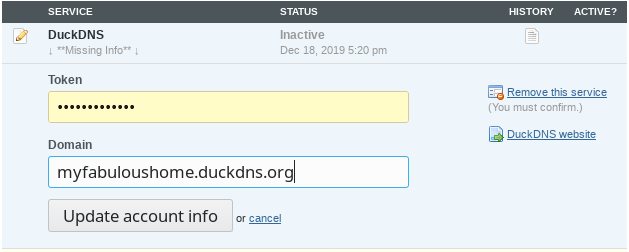
Suppose you already signed up for OpenDNS and set up DNS-O-Matic, here’s how to link your DDNS service to DNS-O-Matic (using Duck DNS as example):
- Log in to DNS-O-Matic with your OpenDNS id.
- Click “Add a Service”, then select your DDNS provider from the dropdown.
- Enter the info for your DDNS service, click “Update account info”.
Finally, make sure you set up DDNS on the pcWRT router. And you’re all set!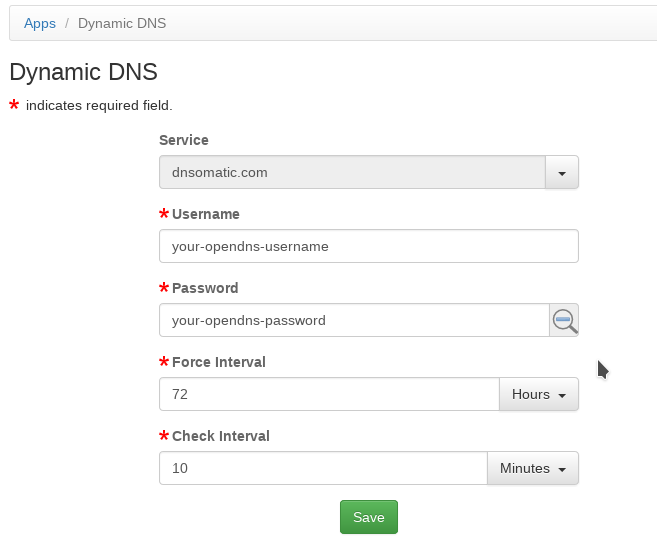
UPDATE (12/22/2019)
DDNS is natively supported beginning with version v2.0.1. Setup is a lot easier & third party DDNS service is no longer required.


Recent Posts
- Observing Android VPN Leaks with the pcWRT Router
- How to set up a second pcWRT router as an Access Point with VLAN support
- Is the MELLO charger a scam (Kickstarter)?
- How to reset the pcWRT router
- How to create your SSH key and use it on the router
Recent Comments
- on How to reset router password by email
- on How to reset router password by email
- on Does your parental control pass the DOH test?
- on How to create your SSH key and use it on the router
- on How to create your SSH key and use it on the router
Archives
- January 2025
- December 2024
- June 2024
- April 2024
- March 2024
- August 2023
- May 2023
- February 2023
- June 2022
- December 2021
- November 2021
- August 2021
- January 2021
- December 2020
- October 2020
- August 2020
- July 2020
- June 2020
- May 2020
- April 2020
- February 2020
- January 2020
- December 2019
- October 2019
- December 2018
- August 2018
- July 2018
- June 2018
- January 2018
- November 2017
- October 2017
- September 2017
- August 2017
- July 2017
- June 2017
- January 2017
- August 2016
- May 2016
- December 2015
- August 2015
- July 2015
- May 2015
- April 2015
- March 2015
Categories


